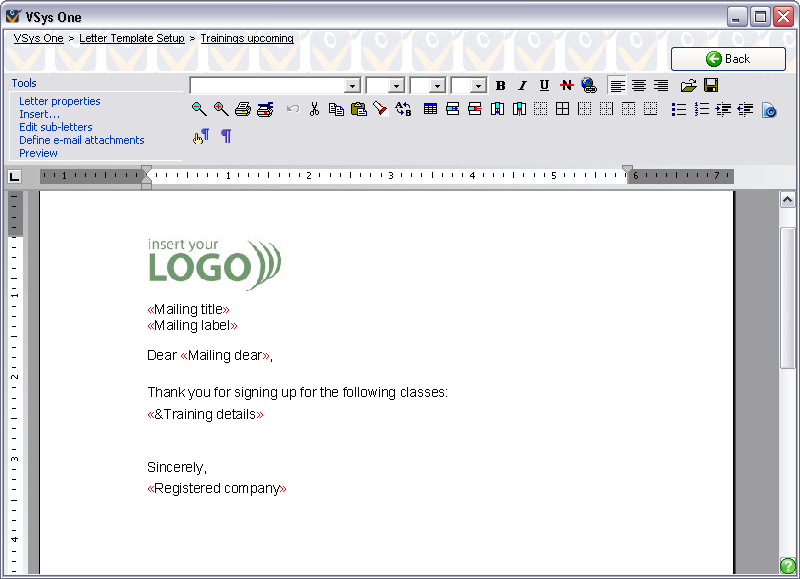
Click open any template an in the Letter Template Editor you have what looks and works just like a standard word processor. Most of the formatting, editing, and table controls (buttons) should look familiar, though there are a few special controls.
|
Inserts a hyperlink (web link). |
|
Inserts a table. |
|
Inserts a new row into an existing table. |
|
Deletes the current row from a table. |
|
Inserts a new column into an existing table. |
|
Deletes the current column from a table. |
|
Turns off borders on the selected cells in the table. |
|
Turns on all borders on the selected cells in the table. |
|
Turns just the left borders on the selected cells in the table. |
|
Turns just the right borders on the selected cells in the table. |
|
Turns just the top borders on the selected cells in the table. |
|
Turns just the bottom borders on the selected cells in the table. |
|
Defines the page properties - paper type, margins, header, and orientation. |
|
Defines paragraph properties - alignment, outline levels, indents and spacing. |
|
Shows/hides "special" and editing characters. |
Tools
Letter properties |
Brings up the dialog, which lets you name the letter, define its type, and set other values. |
Insert... |
Lets you include merge fields, sub-letters and images into the document. |
Edit sub-letters |
Defines sub-letters for this template |
Define e-mail attachments |
Use this to define the attachment files available in letter templates which will be used to send e-mails. |
Preview |
|
Merge fields and sub-letters
In the previous example you'll see two odd looking bits of text.
|
This is a merged field, added by clicking on Insert data field. When the letter template is merged, this text will be replaced by the value in the field "Current date". Don't try to edit these fields, it won't work. If you've added the wrong field by mistake, delete it and then add the correct one. |
|
This is a sub-letter, which is much like a detail report. In this example, it will be replaced by zero or more training records, with an optional header and footer, as defined in the sub-letter you've called "Training details". Sub-letter fields can be identified by the "&" at the beginning. |
Images
VSys lets you drag-and-drop images from other applications. Just take the image you want to include and drag it from your hard drive right into the editor.
You can also paste pictures directly into your letter templates. To insert a picture, first copy it to the clipboard from an application which understands that image type, such as Photoshop, the Windows Picture and Fax Viewer, etc. Paste it into the body of your letter template by putting the cursor where you want the image to appear, then clicking on the ![]() image on the toolbar to paste in your picture. You can then use the resizing handles around the picture to change its size.
image on the toolbar to paste in your picture. You can then use the resizing handles around the picture to change its size.
Using the resize handles at the corners of the image will keep its proportions correct. The handles on the top, bottom and sides will let you stretch the image out of shape.
Try to keep your image size reasonably small. Multi-megapixel images directly from your digital camera are huge, and will take up a tremendous amount of disk space in the letter template, but also in each saved letter and e-mail sent. A good rule of thumb is to keep the image below one million pixels, or generally smaller than 1,000 pixels on its longest side.